Configuration
Configuration is done in the Lime CRM webclient under Administration page -> Plugins -> Newsletter.
The configuration is stored in the sys_data table.
The editor lets you map the tables and fields to the corresponding fields in the actual database.
In the best of worlds, this doesn't need to be touched since you have installed the LIP package. Editing is done in JSON format by toggling the Show code editor switch. If you are using an older server version that does not support lime-admin 2 you still use the old YAML format.
The add-on can also be enabled or disabled by changing the enabled
boolean. This makes the endpoints respond with a 403 error.
Configure Lime CRM
An example of what a valid config may look like can be found on Example config page.
Using Consent type mapping
In version 2 of the newsletter integration we introduced support for different types of send-outs, e.g newsletters and product information. This can be done by mapping consent types in Lime CRM to publications in Lime Marketing.
You can for example map the Product info consent type in Lime CRM to the publications Lime CRM customer info, Lime Go customer info and Lime Easy customer info:
"consenttypemapping":{
    "consenttypemappings":[
       {"consenttype": 1002, # Product info
        "publications":[
            {"publication": 20}, # Lime CRM customer info
            {"publication": 30}, # Lime Go customer info
            {"publication": 40}, # Lime Easy customer info
        ]
       }
    ]
}
You can find the publication id by clicking the i -icon in the list of publication in Lime Marketing
If you don't have consent type and consent tables in your database leave the consenttypemapping empty:
"consenttypemapping":{
    "consenttypemappings":[]
}
Import fields
When getting campaign participants you can specify which properties you want to be available in Newsletter using the importfields
under the participant node in the configuration.
This can later be used when replacing merge fields in your campaigns.
For example if you want your email to say "Hello $$person.firstname$$" you can specify the person.firstname in the importfields.
Fields that should be synced to Lime Marketing are formatted like this:
"person": {
    "firstname": null
}
The null value is there to make the importfields backwards compatible to YAML format. You can not sync relation fields by themselves, instead you must define the relation as a json object and sync a field from the related card.
"person": {
    "company": {
        "_id": null
    }
}
All importfields must start from the participant card but can be any related properties found on the card.
Note that only one-to-one (like participantto person) or many-to-one (like person to company) relations are supported.
Example using person:
"participant": {
    "name": "participant", <-- Name of the table
    "properties": {
        "campaign": "campaign",
        "person": "person"
    },
    "importfields":{
        "person":{
            "_id": null,
            "email": null,
            "firstname": null,
            "lastname": null,
            "company":{
                "name": null,
                "status": null
            }
        }
    }
}
Example using company:
"participant":{
    "name": "participant", <-- Name of the table
    "properties":{
        "campaign": "campaign",
        "person": "company"
    },
    "importfields":{
        "company":{
            "_id": null,
            "name": null,
            "phone": null
        }
    }
}
The null values are just to make the file YAML compatible, do not write anything here.
All importfields must start from the participant card but can be any related properties found on the card.
Note that only one-to-one (like participant to person) or many-to-one (like person to company) relations are supported.
Date and time properties are not supported.
The importfields are validated on the server as of version 2.7.0 and will display an error if any non-existing tables or fields are being used. Read access to any fields used are also validated.
Campaign types and campaign statuses
You can filter which types and statuses of campaign you want to see in Newsletter under the campaign table:
"campaign":{
    "name": "campaign",
    "campaigntypes": [
        { "type": "email"}
    ],
    "campaignstatuses": [
        { "status": "planned"},
        { "status": "engoing"}
    ],
    "properties": ....
}
Note that when using lime-newsletter and lime-event the same filter for the campaigns must be used.
Opt-in settings
You can configure the integration to automatically create new limeobjects when someone submits the opt-in form of one or more chosen publications. The feature requires that the limetype has an email field. You must also make sure that all the required fields for the limeobject are present in the fieldmappings section. The same applies for the opt-in form in Lime Marketing, all the required fields must be present and set to required in the form.
    "optinsettings": {
        "enabled": true,
        "create_duplicates": false,
        "publications": [123, 256],
        "limetypesetting": {
            "name": "person",
            "email_field_name": "email",
            "fieldmappings": {
                "email": "check email recipient property name in Lime Marketing",
                "firstname": "check firstname recipient property name in Lime Marketing",
                "lastname": "check lastname recipient property name in Lime Marketing"
                ...
                ...
            }
        }
    }
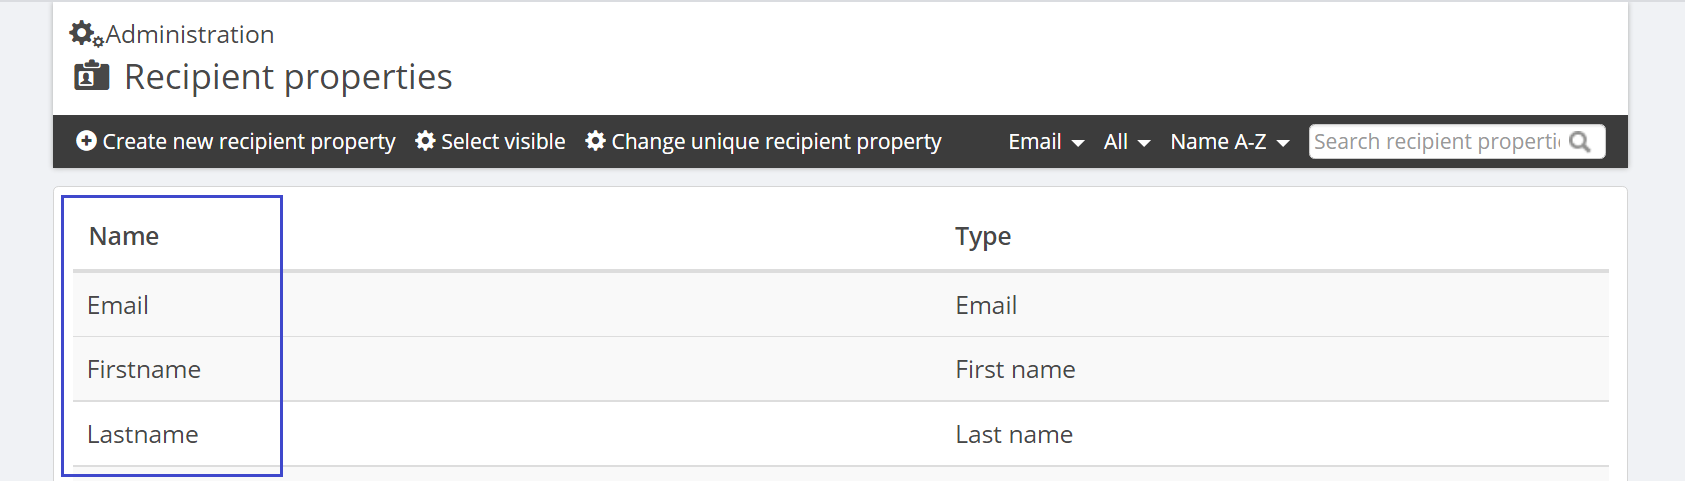
In the section fieldmappings the key on the left is the name of the lime field and the value on the right is the recipient property name in Lime Marketing. The recipient property name in Lime Marketing can be found in Administration -> Email recipient properties.
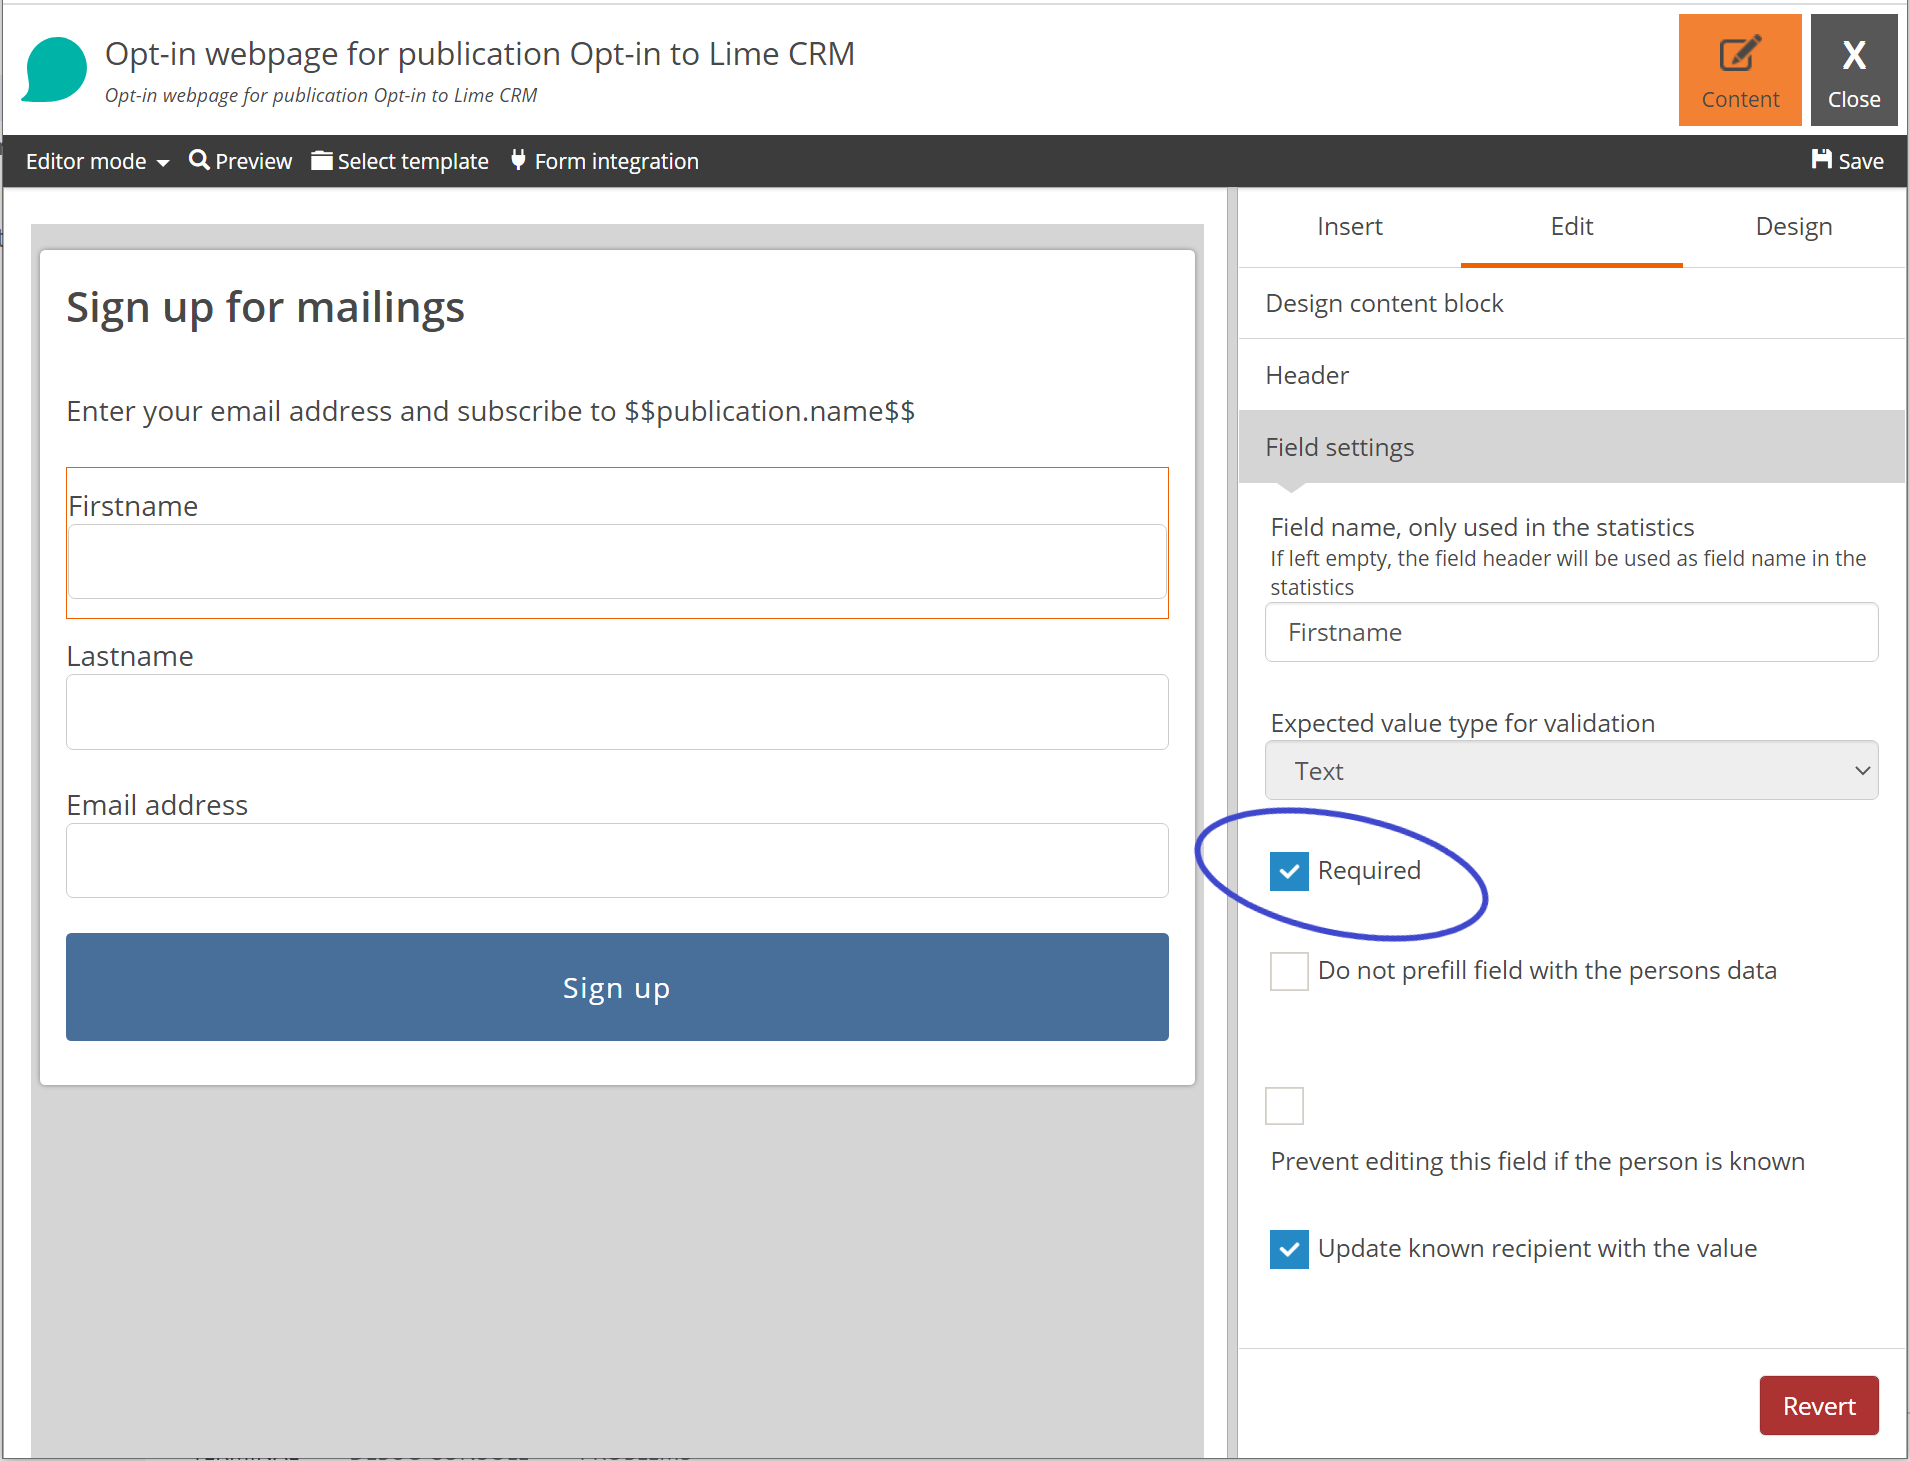
As mentioned you need to make sure that all required properties on the limetype have required form fields on the opt-in form in Lime Marketing. The integration cant create the lime type if not all required fields have data. So make sure that all the required fields has its corresponding field in Lime Marketing and that they are marked as required. Open this editor by clicking on the "Subscription form" link on the publication settings page.
You can control if the feature is active with the enabled field.
create_duplicates controls if you should be able to create a new object if there is already an object with the same email address.
publications contain the ids of all publications that should be able to create new objects. Leave this empty if you want opt-ins from all publications to create objects.
limetypesetting.name is the database table name of the limetype you want to create, for example person or lead.
email_field_name should contain the database name for the email field. Note that the field must be present in the fieldmappings.
fieldmappings is a list of mapped properties between Lime properties and Marketing recipient properties. Map the lime name on the left and the corresponding Marketing name on the right.
It is not possible to map to a property on a relation field. Simple field types works. I.e. the following types: string, text, link, integer, decimal, date, phone, mobilephone.
Link clicks
With the linkclickenabled in your config you can control whether you want link clicks to show up in Lime.
"linkclickenabled": true
Configure the linkclick table under tables:
 "linkclick": {
        "name": "linkclick",
        "properties": {
            "person": "person",
            "mailing": "mailing",
            "linkname": "linkname",
            "linkurl": "linkurl",
            "linkvalue": "linkvalue",
            "linkclicktime": "linkclicktime",
            "linkcategoryid": "linkcategoryid",
            "linkcategoryname": "linkcategoryname"
        }
    }
Set the value for person to the object you are sending your newsletter to (e.g. company or person).
Mail openings
With the emailopeningenabled in your config you can control whether you want mail openings to show up in Lime.
"emailopeningenabled": true
Configure the emailopening table under tables:
 "emailopening": {
        "name": "emailopening",
        "properties": {
            "person": "person",
            "mailing": "mailing",
            "emailopeningtime": "emailopeningtime"
        }
    }
Get Recipients
With the getrecipientsenabled in your config you can control whether you want to be able to fetch mailing recipients from a mailing into Lime Marketing. If the property is not included in the config the value is by default set to true. Contact the Marketing Tech team for more information.
Object content
Add objectcontent to the config. This is a list of lime-queries. Remember to set a unique queryname for each query.
See this example of two queries:
    "objectcontent": [{
                    "queryname": "coworker_query",
                    "query": {
                        "limetype": "coworker",
                        "responseFormat": {
                            "object": {
                                "_id": {
                                    "_alias": "coworkerid"
                                },
                                "firstname": null,
                                "lastname": null,
                                "email": null,
                                "office": {
                                    "visitingaddress1": null
                                }
                                }
                        },
                        "filter": {
                            "op": "=",
                            "key": "_id",
                            "exp": "{0}"
                        }
                    }
                },
                {
                    "queryname": "deals_query",
                    "query": {
                        "limetype": "deal",
                        "responseFormat": {
                            "object": {
                                "_id": {
                                    "_alias": "dealid"
                                },
                                "name": null,
                                "value": null,
                                "coworker":{
                                    "_id": {
                                        "_alias": "coworkerid"
                                    },
                                    "firstname": null,
                                    "lastname": null
                                },
                                "company":{
                                    "name": null
                                }
                                }
                        },
                        "filter": {
                            "op": "=",
                            "key": "coworker._id",
                            "exp": "{0}"
                        }
                    }
                }]
You can use all features of lime-query like nested objects and setting aliases for your fields.
But it's important to set the exp value of the filter to "{0}" since this is what is inserted from the search input in Lime Marketing.
Since Vue can not handle properties stating with '_' or '$' it is recommended to create an alias for any system properties like '_id' or '_descriptive'. If you forget to do this, the illegal characters will automatically be cleaned by Lime Marketing before you insert the data.
Using the company table instead of the person table
It's possible to use another table instead of the person table to act as a person table. Generally, every relation to the person table must be replaced with a relation to the company table instead. A few mandatory fields must also be added to the company table. Finally, some mapping has to be done in the config.
"default":{
    "tables":{
        "consent":{
            "properties":{
                "person": "company"
            }
        },
        "participant":{
            "properties":{
                "person": "company"
            }
        },
        "person":{
            "name": "company",
            "properties":{
                "email": "email",
                "emailhardbounce": "emailhardbounce",
                "firstname": "name",
                "lastname": "name",
                "totaloptout": "totaloptout"
            }
        },
        "recipient":{
            "properties":{
                "person": "company"
            }
        }
    }
}
In LISA you must do the following:
- On the
consentcard, create a relation tocompany. - On the
participantcard, create a relation tocompany. - On the
companycard you need to do a few things: - Create a relation (tab) to
recipient. - Create the following fields:
email,emailhardbouncetotaloptout- not needed if using the consent table- Choose which fields to use as replacement for
firstnameandlastname.companynamecan be used on both.
- On the
recipienttable, verify that the relation to company was properly created.
Sending newsletters to multiple Lime Objects
It's possible to have several configurations, for cases when you have an additional setup of tables, for example if you want to do send-outs to companies in addition to the standard contact persons.
The standard configuration is called default.
You can simply copy the default configuration and call it something else like companies.
Then log into Newsletter and configure a new integration point with the new name under Configuration name.