Installation
1 - Check prerequisites
- Is it a cloud customer - yay! lime-newsletter is already installed go to step 2.
- Is it a on-prem customer with lime-server version = 13.0.3.8 - upgrade lime-server.
- Is it a on-prem customer with lime-server version >= 12.51 < 2020 (i.e. lime-server 13.x but not 13.0.3.8) - yay! lime-newsletter is already installed - goto step 2.
- Is it a on-prem customer with lime-server version >= 2020.x - yay! you need to add the lime-newsletter addon to the customer solution or create a customer solution if it does not already exist.
Do you want the opt-in/lead functionality?
That requires lime-newsletter 2.5.0 or later which requires Lime CRM 2020.x or later.
Do you want the link clicks functionality?
That requires lime-newsletter 2.6.0 or later which requires Lime CRM 2020.x or later.
Since lime-newsletter is based on custom endpoints we need external access to their webclient. If the customer is on-prem make sure the webclient is accessible via IP or a hostname from outside their hosting environment. This requires changes from their IT department. More info here.
Have a look in the platform docs on how to handle solutions and adding dependencies to lime-newsletter. To add lime-newsletter to the solution targeting Lime CRM 2020.x or later run:
poetry add lime-newsletter
If you are running Lime CRM server version 2020.x or newer you can easily update lime-newsletter to the latest version by running the command poetry lock inside your solution.
If you are running an older server version you must upgrade your server to be able to update lime-newsletter.
Make sure you have a Lime Marketing app.
Before you proceed
- Is lime-newsletter installed on the server?
- Can we access the webclient externally?
- Do you have a Lime Marketing app for the customer?
2 - Tables and fields
Now it's time to set up the required tables and fields required for lime-newsletter. The tables and fields are not required to have to the same naming as in our docs but the relation between the tables must be the same. The table and field names are then configured in Lime admin if they differ from the default.
You can do this manually by following this specification or by installing LIP packages if its supported in the environment.
Install the LIP packages in the following order
- consent - Only tables and permissions are required.
- lime-newsletter - Download the latest LIP package from the releases page.
It's important that you use a lime-newsletter LIP package matching the installed version on the Lime-server. If that release of lime-newsletter does not contain a LIP package asset use the first LIP package you can find in a previous version of lime-newsletter.
If you have made any changes to the default tables and field setup, be prepared to configure the changes in Lime admin later.
Make sure that all option fields have key values campaign.type, campaign.campaignstatus (some older core databases were lacking this).
Before you proceed
- Are all required tables and fields set up?
Notice that the following fields have to be added manually in LISA:
person.totaloptout,person.emailhardbounce,campaign.consenttype. - Do all option fields have key values?
3 - Permissions
An API key in Lime CRM will be used at a later stage of the integration setup, make sure that the user for that API key has the correct permissions in the database.
- Create the API user in LISA with the following settings:
- Display name: Newsletter API user
- User name: newsletterapiuser@lime.tech
- Active: Yes
- Type: API
Don't know how to create an API user? Follow instructions here.
-
Create a
Newsletter integrationgroup. Make thenewsletterapiuser@lime.techAPI user a member of this group. -
Create table policies for
tbl_mailing,tbl_recipient,tbl_linkclickandtbl_emailopening, and give users right to read. -
Set the correct permissions for the
Newsletter integrationgroup on each table policy. The group will need read permissions to all tables used by the integration. -
If the solution is using Object Access make sure that the Newsletter API user is a member of a group with access to the data that should be available for the integration to use
| Policy name | R | W | A | D | Apply to |
|---|---|---|---|---|---|
| tbl_person | • | • | • | person table | |
| tbl_campaign | • | campaign table | |||
| tbl_company | • | company table | |||
| tbl_participant | • | participant table | |||
| tbl_mailing | • | • | • | mailing table | |
| tbl_recipient | • | • | • | recipient table | |
| tbl_linkclick | • | • | • | linkclick table - If link clicks are being used | |
| tbl_emailopening | • | • | • | emailopening table - If email openings are being used | |
| tbl_consenttype | • | consenttype table | |||
| tbl_consent | • | • | • | consent table | |
| fld_consenttype | • | consenttype field on consent table |
If you want to use any type other than person as a mailing recipient you will need to add both read and write permissions for that table, e.g. company. If the import fields specify getting data from other tables than person you need to set read permissions on those affected as well (even if person is your mailing recipient).
4 - Configuration in Lime admin
When the lime-newsletter addon is installed and the database meets the requirements its time to configure lime-newsletter in lime admin.
Open Lime admin -> Plugins -> Newsletter from the webclient (switch to code view depending on lime-server version) - there should be a default config there. If there isn't any config or you want to revert you can find the default config here.
More details on the configuration can be found here and also examples on setting up integrations targeting different and/or multiple limetypes.
Things you need to change
- Tables and fields if they don't follow the default setup. Change the name on right part of the ':'. All table names and fields are validated when saving the config so if there are any errors we'll let you know. All tables have a name property which can be changed and they have their fields configured under properties were you also can change its configured value.
"tables": {
      "campaign": {
        "name": "customcampaign", <-- change this part
        "properties": {
          "campaignstatus": "customstatus", <-- and this
Campaigntypesandcampaignstatusare used to filter which campaigns are valid lime-newsletter campaigns. Set up the types or set to empty to use all types and statuses. These are not validated so make you sure you enter the correct ones.
 "campaigntypes": [],
 "campaignstatuses": [],
- Import fields is the configuration you setup to let lime-newsletter know which data we want to transfer to Lime Marketing when doing send-outs. This data can then be merged into the content or used to filter our recipients and content. Data is fetched based on the participant which means you can retrieve any related data from the participant. In the example below you fetch the participant's person.id, person.firstname, person.lastname, person.email, person.company.name.
Id and email are mandatory for the integration to work. The id is later used to connect a recipient to a 'person' in Lime CRM. The import fields are not validated so make sure you enter these correctly.
"participant": {
    "name": "participant",
    "properties": {
        "campaign": "campaign",
        "person": "person"
    },
    "importfields": {
        "person": {
            "_id": null,
            "firstname": null,
            "lastname": null,
            "email": null,
            "company": {
                "name": null
            }
        }
Consenttypemapping is used to tell lime-newsletter which consent type to use for what publication(s). More info on what they do here. You need the ids of the consent type and the publications in question. The id of the publication can be found by pressing the "i" symbol in the list of publications in Lime Marketing. You can leave the setting empty if you don't plan on using consents. More info on how to configure it can be found here.
  "consenttypemapping": {
      "consenttypemappings": []
    }
- Opt-in settings can create new limeobjects of any limetype when someone submits the opt-in form of chosen publication(s). See more info about how to configure it here The opt-in integration requires lime-newsletter 2.5.0 or later which in turn requires Lime CRM 2020.x or later.
    "optinsettings": {
                    "enabled": true,
                    "create_duplicates": false,
                    "publications": [123, 256],
                    "limetypesetting": {
                        "name": "person",
                        "email_field_name": "email",
                        "fieldmappings": {
                            "email": "check email property field name in Lime Marketing",
                            "firstname": "check firstname property field name in Lime Marketing",
                            "lastname": "check lastname property field name in Lime Marketing"
                            ...
                            ...
                        }
                    }
                }
- Link click settings are used for enabling the tracking of link clicks in Lime. Add
linkclickenabledand thelinkclicktable undertablesif you want to use this feature. It requires lime-newsletter 2.6.0 or later and Lime CRM 2020.x or later.
"linkclickenabled": true
 "linkclick": {
        "name": "linkclick",
        "properties": {
            "person": "person",
            "mailing": "mailing",
            "linkname": "linkname",
            "linkurl": "linkurl",
            "linkvalue": "linkvalue",
            "linkclicktime": "linkclicktime",
            "linkcategoryid": "linkcategoryid",
            "linkcategoryname": "linkcategoryname"
        }
    }
See required structure for instructions on how to set up the link click card.
If everything is setup correctly you should be able to save the config. Otherwise check the error message and try to figure out what is wrong. Also check webserver error logs if you have access.
However importfields, campaignstatus, and types are not validated. The relational correctness of the tables and fields are not validated so make sure that is correct by checking the required structure. The consenttype mapping publication ids are not validated so make sure you have the correct ids. The mapping is later visible in Lime Marketing making it easier to verify.
Before you proceed
- Can you save the config?
- Have you double checked the parts that aren't validated?
- Have you changed to config instance name from
default? (Only do so if really necessary) In that case you need that name in the next step.
5 - Add the integration in Lime Marketing
Log in to your Lime Marketing site and go to Administration -> Integrations and add a Lime CRM integration from the button in the top left corner.
Enter the URL to newsletter -> application webclient base URL + /newsletter.
The base URL is the webclient url/application name. Its the same URL as you find in the API docs up until/api.
Enter the API-key for the integration to use.
The Configuration page will look like this with quite a few validation errors and warnings. This is OK, fix the warnings by filling out the required information and click validate at the top left corner. It's really important that you get the URL and API key correct - we won't be able to give you any hints until it's correct.
Leave the configuration name empty unless you have changed the config name from default in Lime admin.
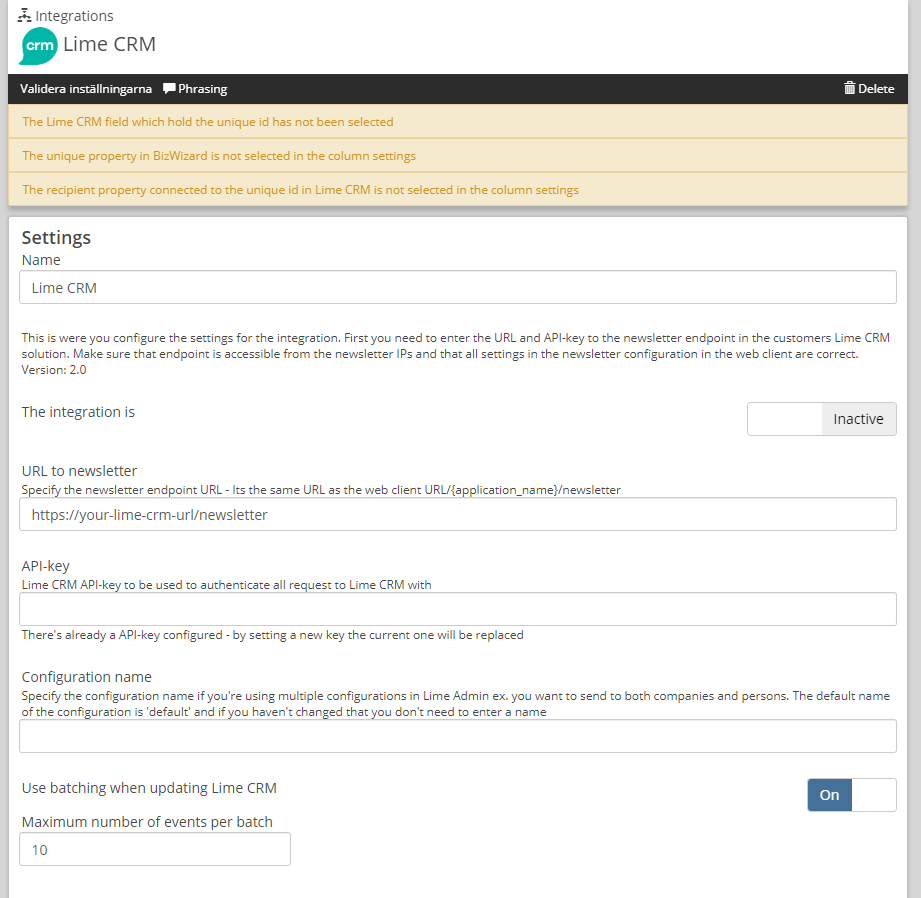
The column settings are specified in the Lime CRM Admin config under importfields. All you need to do now is to map them to properties on the Newsletter recipient. The required ones are email and an id for the person in Lime CRM.

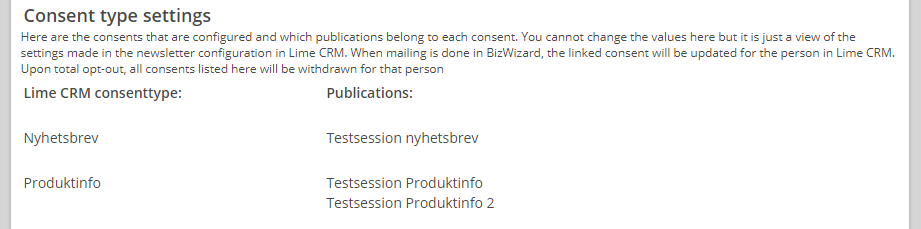
Lastly you will be able to see your consent mappings from the Lime CRM Admin config listed here.
6 - Verify
If everything is validating and no more errors are displayed you are ready to verify. Create a mail message in Lime Marketing and send to a test campaign from Lime CRM. Recipients should be transferred and a mailing i Lime CRM should be created with the correct recipients.