Installation
Complete the preparations below, then follow the numbered steps to install the integration in Lime CRM.
Preparations
Consultant preparations
What hosting does the customer have?
- Go through the internal Lime Newsletter Delivery instructions. For Lime Employees only.
- Order a lime marketing site if the customer doesn't have one already.
- Have you or the sales rep sent out the Newsletter Form?
- Check that the on-prem requirements are met.
- Go through the internal Lime Newsletter Delivery instructions. For Lime Employees only.
- Order a lime marketing site if the customer doesn't have one already.
- Have you or the sales rep sent out the Newsletter Form?
- Can we access the webclient externally?
Customer preparations
- What sending domain do they want? Before go-live, they need to configure the deliverability settings for that domain in order to be able to send emails with it. More info on the required settings in the Deliverability settings section.
- How do they work with consent and do they want to work with consent in Lime?
Once preparations are complete, follow the steps below.
1. Add lime-newsletter to the solution
What hosting does the customer have?
Add lime-newsletter as a dependency to the solution and deploy the new solution release in Cloud admin.
poetry add lime-newsletter
No action needed — lime-newsletter is already available. Continue to step 2.
Add lime-newsletter as a dependency to the solution and install the new solution release.
poetry add lime-newsletter
2. Run addon installer in Lime admin
This will install all the required tables, fields, users and groups. It will also create the API key used for the integration from Lime Marketing to Lime CRM.
You do this by running the addon installer in Administrators page (lime admin) under Settings -> Newsletter -> Setup
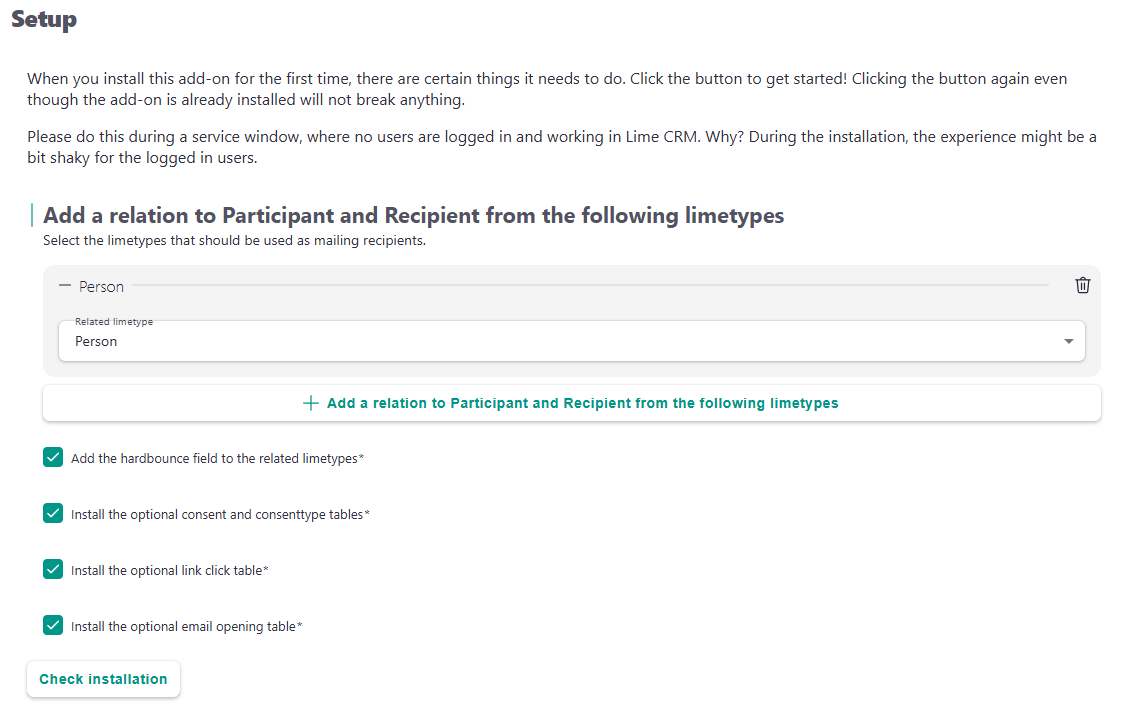
On the Setup page you have a couple of options for how you want newsletter to be installed:
Related limetypes- Select the limetype(s) to use as Mailing Recipients. You must manually verify that the selected limetype(s) have an email field.
Hardbounce- Adds a hard bounce field to the limetypes related to Mailing Recipients.
Consent and Consent type- Required if the customer wants to work with consents in the integration. Creates the necessary relation between Marketing Activities and Consent types.
Link clicks and email openings- Enables tracking of email openings and link clicks in email statistics. Not required for the core functionality of the integration.
Using custom tables
If you do not want to use the default tables for newsletter you can use any tables as long as the relations and structure match the required structure. The table and field names are then configured in Lime Admin if they differ from the default.
- Press "Check installation" followed by "Install" and the setup will do the rest of the work for you. It will create all required tables, fields, users and groups.
- Save the generated API key for the
newsletter-integrationuser, you will need it for the configuration of the integration in Lime Marketing.
(Optional) Add the field totaloptout
Add this field in database designer if you want to be able to monitor total opt-out for recipients.
| database | field type | Swedish | English | Danish | Norwegian | Finnish | Dutch |
|---|---|---|---|---|---|---|---|
| totaloptout | yes/no | Total opt-out | Total opt-out | Total opt-out | Total opt-out | Total opt-out | Total opt-out |
Manual installation without addon installer
If you can't or don't want to use the addon installer, you need to create the tables, fields, users and groups manually in database designer according to this specification.
1. Create tables and fields
Make sure all tables and fields exist according to this specification
2. Create an API user
An API key in Lime CRM will be used at a later stage of the integration setup, make sure that the user for that API key has the correct permissions in the database.
Info
The Addon Installer will add the required user and group for you. You can skip the steps below if you installed the package with the Addon Installer.
- Create a
newsletter-integrationgroup in Lime admin (System -> Security -> Groups). - Create the API user in Lime admin (System -> Security -> Users) with the following settings:
- User name: newsletter-integration@lime-crm.com
- Display name: newsletter-integration@lime-crm.com
- User type: API
- Active: Yes
- Add the
newsletter-integration@lime-crm.comuser to thenewsletter-integrationgroup. - Create an API key for the user and save it for later use.
Don't know how to create an API user? Follow instructions here.
Desktop client configuration (Optional)
This step is only necessary if Newsletter is supposed to be used from the Lime CRM Desktop Client. You don't have to do this if the customer is only using the web client.
-
Add the SQL expression on mailing.htmlsendoutlink and mailing.htmlstatisticlink. The SQL expressions are found in text files in the folder lisa\sql_expressions in the assets.zip attached to the latest release in GitHub.
-
Add the icons for the tables mailing, emailopening, linkclick and recipient. The icons are found in the folder lisa\icons. If you cannot find the tables in LISA, log out and back in from the designer.
- Add descriptive expressions for mailing, emailopening, linkclick and recipient. The descriptive expressions are found in text files in the folder lisa\descriptives.
-
If your Lime CRM application already has an Actionpad for the marketing activity/campaign card: Add the code below to the
campaign.htmlActionpad. Otherwise, create an actionpad with the same database name as your marketing activity table and add the code.<button class="btn btn-lime btn-info" data-bind="openURL: 'https://app.bwz.se/customer/', text:'Open Lime Marketing', icon: 'fa-paper-plane-o'"></button>
Adjust the URL to your customers Lime Marketing site.
3. Create policies in database designer
- Create new table policies for
tbl_mailing,tbl_recipient,tbl_linkclickandtbl_emailopening, and set the following permissions for normal users.
| Policy name | R | W | A | D | Apply to |
|---|---|---|---|---|---|
| tbl_mailing | • | mailing table | |||
| tbl_recipient | • | recipient table | |||
| tbl_linkclick | • | linkclick table - If link clicks are being used | |||
| tbl_emailopening | • | emailopening table - If email openings are being used |
- Set the correct permissions for the
newsletter-integrationgroup on each table policy. The group will need read permissions to all tables used by the integration. Then, apply these policies on the corresponding tables.
| Policy name | R | W | A | D | Apply to |
|---|---|---|---|---|---|
| tbl_person | • | • | • | person table | |
| tbl_campaign | • | campaign table | |||
| tbl_company | • | company table | |||
| tbl_participant | • | participant table | |||
| tbl_mailing | • | • | • | mailing table | |
| tbl_recipient | • | • | • | recipient table | |
| tbl_linkclick | • | • | • | linkclick table - If link clicks are being used | |
| tbl_emailopening | • | • | • | emailopening table - If email openings are being used | |
| tbl_consenttype | • | consenttype table | |||
| tbl_consent | • | • | • | consent table | |
| fld_consenttype | • | consenttype field on consent table |
Using another table than person as mailing recipients e.g. company
If you want to use any type other than person as a mailing recipient you will need to add both read and write permissions for that table, e.g. company. If the import fields specify getting data from other tables than person you need to set read permissions on those affected as well (even if person is your mailing recipient).
4. Configuration
You have now installed everything regarding the structure in Lime CRM and the API user. Continue with the configuration of the integration.